
User Guide
AUMI version 4.
Adaptive Use Musical Instruments (AUMI) software interface enables people who have very limited controlled (voluntary) movement to independently engage in music making.
AUMI promotes accessibility of musical expression for all people, regardless of level of physical ability. The AUMI interface enables the user to play sounds and musical phrases through movement and gestures. This is an entry to improvisation that enables exploration of sounds ranging from pitches to noises rather than learning set pieces. Free, easy to use, effective, creative, multi-functional and fun, AUMI is a valuable tool in building new inclusive musical communities and collaborations while challenging societal barriers of ability/disability and assumptions of who can be a “musician”.
The first AUMI application was created in 2007 at RPI, and ongoing development of the desktop application is carried out at the Input Devices and Music Interaction Laboratory (IDMIL) at McGill University. The current version (v4) was written by Ivan Franco, with subsequent updates and development by John Sullivan. AUMI is also available as an iOS app for iPad and iPhone, developed by Henry Lowengard.
The AUMI Consortium is an international research group of musicians, programmers, therapists and researchers dedicated to exploring, sustaining, developing, and sharing AUMI. Consortium members include RPI-CCC, Kansas University InterArts, McGill University, Lakehead University and Memorial University. The AUMI team is also collaborating with an international research project on Improvisation, Community, and Social Practice (ICASP) centered at the University of Guelph in Canada.
Table of Contents
- I. Introduction
- II. Download and installation
- III. Application Interface
- IV. Getting Started
- V. Components
- VI. Presets
- Appendices
I. Introduction
The Adaptive Use Musical Instruments software interface enables the user to play sounds and musical phrases through movement and gestures captured by a computer’s built-in or connected web camera. Using computer vision algorithms, the application tracks the user’s movement across a series of zones. Movement from one zone to another triggers a ‘note’ to be played from a selected instrument in the app. Available sounds include traditional instruments, special effects, sampled loops, as well as the ability for the user to load their own custom sounds. It can also output MIDI to a computer’s general MIDI player or external devices.
New for version 4
AUMI v4 has been rebuilt from the ground up. The result is that the application is faster and more responsive, featuring a new look and feel.
General
- New user interface with updated layout and simplified controls.
- Completely rebuilt motion tracking and interaction modules with adjustable onscreen guides.
- Interaction is now separated from sound, so that any interaction type can control any sound module.
- Introduced preset system for saving and recalling user settings, and ability to share presets between computers.
Modules
- Completely redesigned interaction modules, including new Radial Tracker module
- New Keyboard module featuring:
- Simplified interface.
- Introduced multiple sound libraries, including content from the AUMI iOS app.
- Now users can add their own sounds.
- New Sampler sound module with option for users to add their own sounds.
II. Download and installation
The latest version of the AUMI desktop application is available for free download at aumiapp.com.
Macintosh
BEFORE YOU START: If AUMI has been installed on your computer previously, you must do the following to ensure the new application will function properly: In Finder, go to your /Applications directory to see if there is a previous version of AUMI installed there. If there is, delete it or move it to a different location, otherwise the new application will not function.
- Download the latest version of the desktop application for Mac OS to your computer from http://aumiapp.com/download.php.
- Double click on the on the
.pkgfile you downloaded to install the AUMI application to your/Applicationsdirectory. Your application is now installed and ready to use.
TIP: If you experience problems with the application running correctly, and you have ensured that you only have the single new AUMI application installed in the
/Applicationsdirectory, see Appendix C. Troubleshooting for additional instructions.
Windows
- Download the latest version of the desktop application for Windows to your computer from http://aumiapp.com/download.php.
- Double click on the downloaded
.zipfile to expand it. - Move the newly created
/AUMIdirectory to wherever you want to keep it, such as yourProgram Filesdirectory. NOTE: the items in the AUMI directory must be preserved as is when unzipped, though you can move the directory wherever you like on your computer. - Inside the AUMI directory that is created, click on
AUMI.exeto launch the application. If you like, you can right click and create an shortcut to put on your desktop as well.
III. Application Interface
The application display is divided into five distinct sections. Moving counter-clockwise from the center top, the sections are as follows. Each part of the application is explained in depth in Sections V and VI.
- Camera Display
- Control Panel
- Interaction Module
- Sound Module
- Title Bar
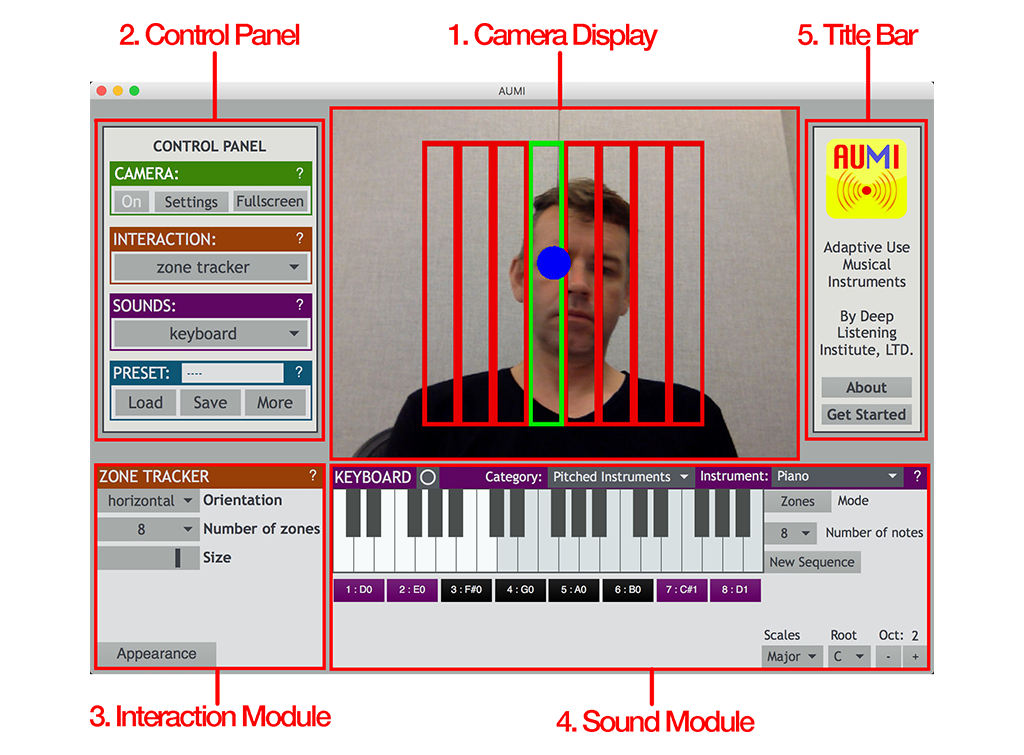
Camera Display
The main window of the application displays a realtime camera stream when the camera is turned on. The window also displays a pattern of lines overlayed on top of the camera image which indicate boundaries across which the user will traverse to trigger sounds.
Control Panel
Use the first three items in the control panel to configure the basic parameters for operation: Camera, Interaction, and Sounds. The fourth item, Presets, allows for the storage and recall of user settings.
Click on the [?] in the upper right corner of each item to open a pop-up window with information about that item.
Interaction Module
The interaction module determines how the user’s movements trigger sound. There are three interaction modes, which are selected in the Control panel:
- Zone tracker
- Radial tracker
- Relative movement
Notes are triggered by the user’s movements which are tracked by the camera. With the zone and radial tracker modules, a tracked point (such as the user’s nose or eye) moves across boundary lines between zones to trigger notes. With the relative movement module, the cumulative amount of movement detected by the camera moves a virtual tracking point across the boundary lines to trigger notes.
Sound Module
This area determines what sounds AUMI will produce. There are currently two modules to choose from, the Keyboard instrument and the Sampler. IT functions similarly to how physical keyboard would, with notes triggered across a piano-style keyboard. The sounds produced are selected from the included sound libraries, custom sounds loaded by the user, or exported to a MIDI device (either the computer’s internal MIDI engine or an external device).
Title Bar
The title bar is a static area that displays basic information about the application. The ‘About’ button opens a pop-up window containing detailed application information. The ‘Get Started’ button opens a pop-up window with a short overview of the application and basic operation instructions.
Menu Bar - Audio Status

While there are several items in the top menu bar, one item of primary importance is ‘Audio Status’ in the ‘Audio’ menu. This controls AUMI’s overall audio settings, such as selection of the correct playback device.
IV. Getting Started
Successful operation of AUMI requires three things: the camera must be turned on, an interaction module must be selected, and a sound module must be selected. This is done in the Control Panel.
- Turn the camera on with the on/off button. The computer’s default camera will be selected. Press the ‘Settings’ button to access camera settings and or to select a different camera.
- Select an interaction module from the ‘Interaction’ drop-down menu. Adjust the main settings with the module controls.
- Select a sound module from the ‘Sounds’ drop-down menu. Within the sound module, select the desired sound(s) and options with the onscreen controls.
Each item above is explained in detail in Section V. Components.
TIP: If neither interaction nor sound module has been selected, the application will display a Quick Start option in the sound module panel. Press it to begin playing the instrument with the default configuration of the zone tracker module and keyboard instrument. Individual settings of each component (camera, interaction and sound module) will be recalled from the last used setting or the factory default. The computer’s default camera will be turned on.

Above: A Quick Start option is displayed when no modules are selected.
Playing AUMI
While each interaction and sound module has it’s own behavior, the overall operation of of AUMI fundamentally the same for each. The user should be situated facing the computer screen in view of the camera. AUMI is most commonly operated with the computer’s built-in camera, so this should be easily achieved. However, with an external camera, a variety of other configurations can be used, especially when utilized along with an external display.
When using the zone or radial tracker, use the mouse or trackpad to click and drag the tracking dot in the camera display area to a point on the user that you want to track.
TIP: Choose a point that contrasts well with the rest of the camera image. For example, if tracking a facial feature, the eye usually works well as it provides high contrast from the uniform skintone of the user. A hand or fingertip can track well provided that the color of the user’s shirt and other visible background scenery is of adequate different color.
Once the tracking dot is aligned with the desired tracking point, the user can move over the zones represented by the lines on the camera display to trigger notes. The number of zones selected from the module determines how many different notes can be played. Settings on the Keyboard module allow for expanded playback options including playing longer sequences of notes and melodic sequences.
If the tracking point moves outside of the camera view, by default it will remain at the edge of the screen and try to reconnect with the tracking point when it comes back in to view. If after 2 seconds it hasn’t reconnected, it will return to the center of the screen. There are additional tracking modes that are discussed in the Interaction Modules section.
The relative movement interaction mode propels the tracking dot based on the amount and direction of overall movement detected by the camera instead of following a selected point. This mode makes for easier configuration and playing, though may be more difficult to control.
Refer to Appendix B. Best Practices and Tips for pointers and advice to optimize your AUMI experience.
Help and Help Menus
In addition to this user guide, each section of the application has it’s own in-app help screen. Click on the [?] icon at the right of the title bar of each item for help.
V. Components
This section covers each component of AUMI in depth, including all modes of operation and settings.
Camera
The camera is the primary input device for AUMI. That is, the user’s movements are tracked by a camera and transcoded into instructions that control the instrument.
Operation
From the control panel, click the On/Off button to start and stop the primary camera. A compatible web camera recognized by the computer must be attached (usually the built-in web-camera). If more than one camera is attached, it can be selected in the settings.
The live camera feed is shown in the Camera Display area. Toggle fullscreen by clicking the Fullscreen button or pressing the [escape] key. Return to normal view by pressing the [escape] key again.
Settings
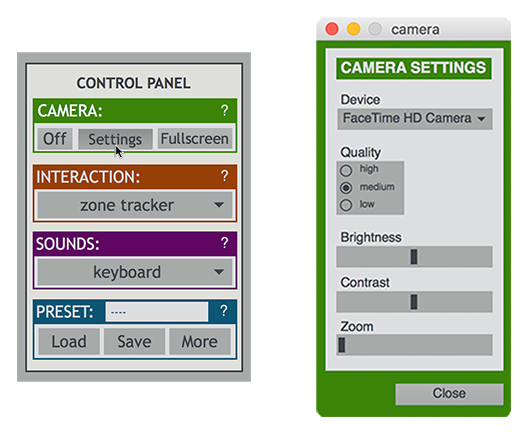
Press the Camera Settings button in the Control Panel to open a window with the following options:
- Device - Select camera from the dropdown menu.
- Quality - Select resolution of camera input. Note that results will vary depending on the type and resolution of your camera.
- Brightness - Move the slider to adjust the overall brightness of the camera image. Adjusting this, along with the Contrast setting, may improve performance in high or low light environments.
- Contrast - Move the slider to adjust the contrast of the image. Decreasing the value (moving slider to the left) reduces difference in luminance between light and dark areas of the image, which may be helpful in environments with pronounced highlights or shadows. Increasing the value (moving slider to the right) will increase the luminance, which will help in extremely bright or dark environments.
- Zoom - Allows the camera to zoom in or out of the image. This can be useful to focus control on a specific area.
Interaction Modules
The current version of AUMI comes with three different interaction modules. All of the modules interact with the sound module in the same basic way: The user moves a tracking dot across zones shown in the Camera Display area. Transitioning across the guide lines from one zone to the next sends out a trigger message that is received by the sound module, which in turn plays the corresponding note.
NOTE: One of the key developments of the new version is the separation between interaction and sound modules, so any interaction module can be used with any sound module. An exciting part of the ongoing development of AUMI is availability of standardized module formats and data formats that make it easy to develop new types of interaction and sound controls.
While the current sound modules all use the trigger signal to play a note, future modules can be programmed to use the control signals in a variety of other ways. For instance, a certain value could trigger a change of instrument, or start and stop a rhythmic loop, while continuous control data could modulate affects or overall volume.
Zone Tracker
![]()
The zone tracker is the default interaction module. By default it contains a grid of eight rectangular zones that are superimposed over the camera view in the Camera Display area. A tracking dot on the screen follows the movement of the point beneath it on the camera display. Computer vision motion-tracking algorithms will follow the point that the marker is focused on, thus moving the tracking dot across the screen. As the dot moves from one zone and into the next, it sends a trigger message to the sound module, which plays the corresponding note.
At any point the tracking dot can be returned to the center of the display by pressing [spacebar], and can be focused on a new point simply by dragging the dot to a new location on the screen.
If the tracking point moves outside of the view of the camera, its default behavior will be to remain at the edge of the screen and try to reconnect for a short amount of time. If it cannot reconnect it will return to the center of the screen and begin tracking there. Other behaviors can be selected in the with the Edge Tracking option in the Appearance panel.
The module has the following onscreen settings that can be adjusted, as well as additional settings in the Appearance panel.
- Orientation - The grid orientation can be either horizontal (default) or vertical. In horizontal mode, motion is tracked on the horizontal plane (left and right). Vertical motion is disregarded, though the tracking point must stay within the vertical boundary of the Camera Display.
- Number of zones - Selects the number of divisions in the grid (from 2 to 8). This corresponds to the trigger messages sent out to the sound module. For instance, 8 zones will generate triggers 1 through 8. It is up to the sound module to take these messages and associate them to the appropriate action. For instance, the keyboard module can either play a fixed set of 8 notes, or play back an ordered sequence of up to 24 notes.
- Size - Adjusts the size of the grid relative to the size of the Camera Display.
Radial Tracker
![]()
The radial tracker operates similarly to the zone tracker, except that the zones are arranged in a circular orientation. Moving the tracking point between the zones sends the corresponding trigger message. Additionally, zones can be triggered from the center into different zones, allowing a user to play non-consecutive notes with some practice.
- Number of zones - Selects the number of divisions in the radius, from 2 to 8. This corresponds to the trigger messages sent out to the sound module. For instance, 8 zones will generate triggers 1 through 8. It is up to the sound module to take these messages and associate them to the appropriate action. For instance, the keyboard module can either play a fixed set of 8 notes, or play back an ordered sequence of up to 24 notes.
- Size - Adjusts the overall size of the circle relative to the size of the Camera Display.
- Center - Adjusts the size of the inner circle relative to the overall circle diameter. In addition to triggering messages when moving between zones, it is also possible to trigger different zones from the center, allowing a user to play non-consecutive notes with some practice. This is most easily achieved by increasing the size of the inner circle with this parameter.
Relative Movement
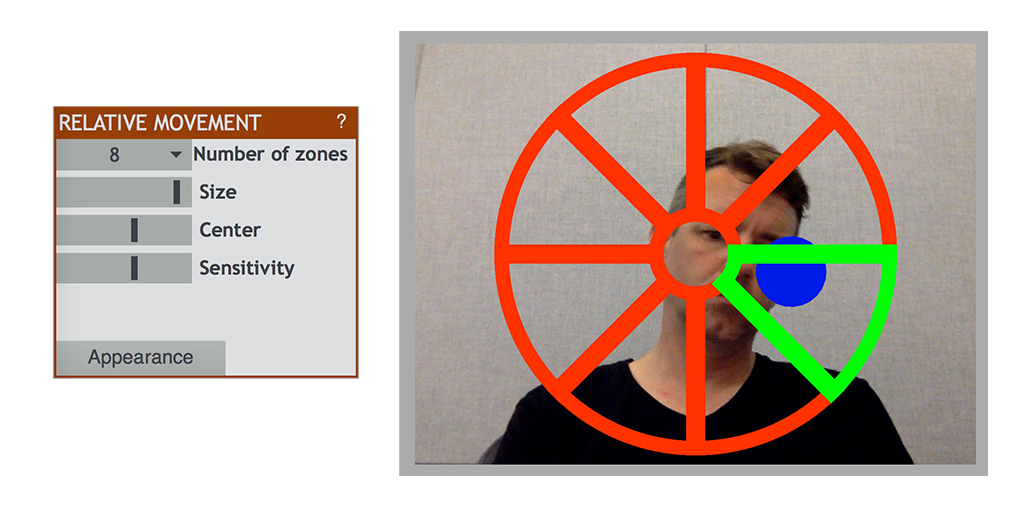
The relative movement tracker functions by calculating the overall amount and direction of motion detected by the camera, which in turn propels the tracking dot over through radial zones identical to the radial tracker. As motion decreases and stops, the tracking dot returns to the center of the circle.
- Number of zones - Selects the number of divisions in the radius, from 2 to 8. This corresponds to the trigger messages sent out to the sound module. For instance, 8 zones will generate triggers 1 through 8. It is up to the sound module to take these messages and associate them to the appropriate action. For instance, the keyboard module can either play a fixed set of 8 notes, or play back an ordered sequence of up to 24 notes.
- Size - Adjusts the overall size of the circle relative to the size of the Camera Display.
- Center - Adjusts the size of the inner circle relative to the overall circle diameter. In addition to triggering messages when moving between zones, it is also possible to trigger different zones from the center, allowing a user to play non-consecutive notes (with some practice). This is most easily achieved by increasing the size of the inner circle with this parameter.
Sensitivity - Controls the amount of motion required to move the tracking dot. Moving the slider to the left will decrease sensitivity, so that that more motion is required to move the dot and trigger notes. Alternately, moving the slider to the right increases sensitivity so that less motion is required to move the dot.
To achieve satisfactory results with the Relative Movement module, it is important to adjust the Sensitivity control to match the amplitude of the user’s movements.
Appearance
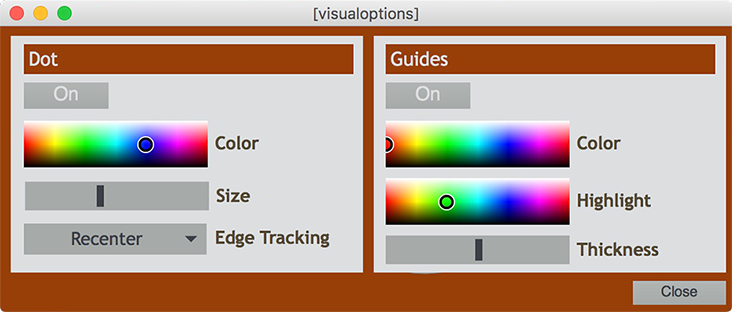
Each Interaction module has an Appearance button, which opens up a window with additional settings for the module.
NOTE: The Appearance settings are the same for each module, but they are saved independently for each. Settings will not be transferred if a new module is selected.
Dot
- On/Off - Click the button to display or hide the tracking dot in the camera display. The dot is set to ‘On’ by default.
- Color - Drag the circle inside the color bar to change the color of the tracking dot.
- Size - Move the slider left and right to decrease or increase the size of the tracking dot.
- Edge Tracking - This setting changes the behavior of the tracking dot when it reaches the edge of the camera display. There are three different modes:
Recenter (default): If the tracking point moves beyond the boundary of the camera display, the dot will remain at the edge where the point was lost for two seconds. If the point comes back into view it will attempt to reconnect, otherwise, after two seconds it will return to the center of the display and begin tracking the point there.
Occasionally the the dot may inadvertently reconnect to the wrong point. If this happens you can either press [spacebar] to recenter the dot, or drag the dot back to the correct position with the mouse or trackpad.
Restrain: If the tracking point moves beyond the boundary of the camera display, the dot will remain at the edge and attempt to reconnect.
Occasionally the the dot may become ‘stuck’ to the edge of the display, or inadvertently reconnect to the wrong point. If this happens you can either press [spacebar] to recenter the dot, or drag the dot back to the correct position with the mouse or trackpad.
None: In this mode the tracking dot is not restrained at the edge of the display area. The dot may disappear beyond the edge and attempt to continue tracking until the point returns to the display area.
While this mode will work reasonably well if the tracking point remains close to the edge, if the point moves farther away it may result in the tracking dot getting ‘lost’ and not returning to the display area. If this happens, press [spacebar] to recenter the dot.
Guides
- On/Off - Click the button to display or hide the guides in the camera display. The dot is set to ‘On’ by default.
- Color - Drag the circle inside the color bar to change the color of the guides.
- Highlight - Drag the circle inside the color picker to change the highlight color of the guides. The highlight color is used to show a zone that is activated.
- Thickness - Move the slider left and right to decrease or increase the thickness of the guides. Note that this setting corresponds only to the visual display and does not effect the way the zones are triggered.
Sound Modules
There are currently two sound modules included with AUMI v.4, the Keyboard and the Sampler.
Keyboard

The keyboard is the default instrument in AUMI. It receives input from the interaction module that triggers notes on the keyboard and plays back the appropriate sound that has been selected.
The keyboard plays notes in one of two ways, depending on the mode that is selected. In Zones mode (the default mode), each zone of the interaction module is mapped to a discreet note, so triggering zone 1 plays note 1, zone 2 plays note 2, etc. In Sequence mode, the order of the zones doesn’t matter, and any zone triggered will play the next note that is designated by the Note Sequencer. A full explanation is given in the Note Sequencer and Options Panel sections.
There are several options for playback, which are highlighted by the following sections of the module’s interface:
- Menu Bar
- Piano Keyboard
- Note Sequencer
- Options Panel
Menu Bar
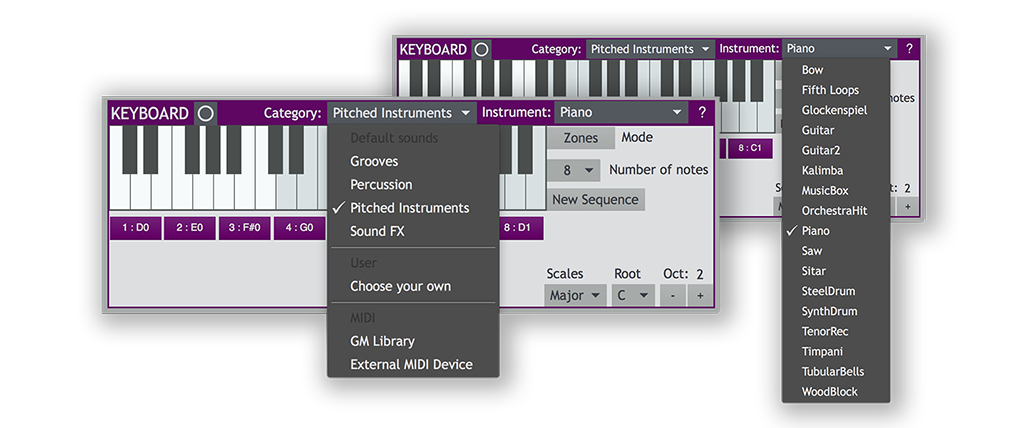
The primary function of the menu bar is to select the sound that the keyboard will play. This is done with two dropdown menus. The Category menu contains three sections: Default sounds, User sounds, and MIDI outputs. The second menu, Instrument, is context sensitive and its function depends on the option chosen in the Category menu.
- In the Default Sounds section, the Instrument menu allows you to select an instrument from one of the the selected subgroups of instruments.
- The User section has just one option, ‘Choose your own’. This option brings up a dialog window for you to select a folder containing soundfiles. The soundfiles will be mapped to the keys of the keyboard. The Instrument menu displays the name of the folder you selected, as well as an option to select a new folder of sounds.
- The MIDI section has two options:
- GM LIbrary connects AUMI to your computer’s internal MIDI player. The Instrument menu displays the standard General MIDI collection of 128 instruments that you can select.
- External MIDI Device allows you to connect AUMI to any MIDI-enabled external software or hardware. This could be another music application, such as Garage Band, or to a hardware synthesizer, provided your computer, audio interface and the hardware have the appropriate physical MIDI inputs and outputs. The Instrument menu lists the 2 MIDI output ports that are available (from AUMI 1 and from AUMI 2). These will be the ports that the external device or software will receive MIDI from.
NOTE When using either of the MIDI options, the sound is generated from another source and not from within AUMI. Keep this in mind if you are troubleshooting audio issues in this mode. The AUMI Audio Status settings will not apply.
In addition to the sound selection menus, the menu bar also contains a clickable button on the left next to the title (circle icon) that will trigger the next note. This can be helpful to test your instrument selection or for audio troubleshooting if need be.
On the far right of the menu bar, there is also a [?] icon that you can click to bring up a help window.
Piano Keyboard
The piano keyboard displays which notes are played by the user interaction. Additionally, the keys can also be played by clicking directly on them.
By default, the keyboard displays 36 notes. However, the actual number of notes available depends on the instrument selected and can go up to 128 notes. If the instrument contains more than 36 notes, higher or lower registers can be reached by using the Octave +/- buttons in the options panel. If the selected instrument contains fewer than 36 notes, the keyboard will be shortened to show only the notes available.
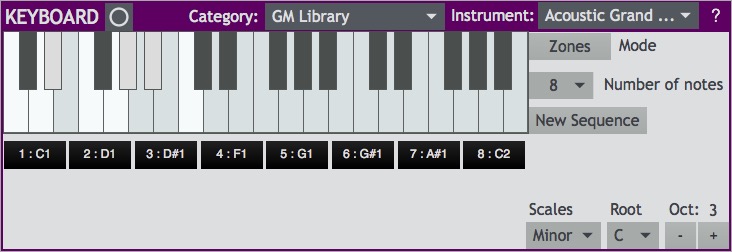
Above: C minor scale sequence. The active notes in the scale are highlghted in white/light gray, while the other inactive notes are shown in gray/black.
The keys of the keyboard have two different appearances. ‘Active’ notes are displayed with the white keys (naturals) in white and black keys (sharps and flats) in gray. These active notes correspond with the notes that the interaction zones will trigger. ‘Inactive’ notes are displayed with the white (natural) keys in light gray and black (sharp/flat) keys in black. The inactive notes are disregarded by the interaction modules and will not be triggered. You can select which notes are active by using the Note Sequencer or setting the desired scale, root note and octave in the options panel.
Note Sequencer
The note sequencer section displays names of the notes that are available for the interaction module to trigger. The note slots in the sequencer correspond with the ‘active’ notes displayed on the keyboard. By default, the notes in the slots are organized in ascending order (i.e., the C major scale). However, sequences can be created and changed in the options panel.
The notes in the note sequence are triggered in one of two ways, depending on the mode set in the options panel.
Options Panel
The Options Panel contains all of the settings for note playback within the keyboard module.
- Mode controls in what order the notes in note sequencer get played back. There are two options:
With Zones mode, each zone of the interaction module is mapped to the corresponding note slot, so that zone 1 triggers the note in note sequencer slot #1, zone 2 triggers the note in slot 2, etc.
It is not unusual for there to be more note slots than zones in the interaction module. In these cases, the Zones mode will only play the first slots up to the number of zones available, and the additional slots will be ignored.
- In Sequence mode, the slots in the note sequencer are always triggered in order, and the zone number of the interaction module is ignored. When the last note of the sequence is played, it will wrap around and the next note will be the first of the sequence again. This behavior allows for sequences longer than the number of zones available to be played, and also allows for pre-programmed melodies to be played.
- Number of notes designates how many notes the sequencer contains. Sequences of more than 8 notes will benefit from using the Sequence Mode as the additional notes would not be triggered with Zones Mode.
- New Sequence clears and unlocks the slots in the note sequencer, allowing you to enter a custom sequence. Select the notes you want by clicking on the piano keyboard one note at a time until the sequence is full. If you wish to start over, press the New Sequence button again.
- Scales, Root, and Octave menus and buttons allow you to automatically set scale-based sequences.
- Scales selects from one of five common scales: major, minor, blues, pentatonic, and chromatic.
- Root selects the root note of the scale.
Octave selects the octave of the scale, as well as the range of the displayed keyboard. the [+] and [-] will be grayed out respectively if there are no higher or lower notes in the selected instrument.
If the selected instrument contains only a few notes, or the starting note is in a high register (via setting the root and/or octave note accordingly) there may not be enough ascending notes to fill the entire sequence. In this case, the sequence will continue at the bottom-most available note in the scale and ascend from there.
Sampler
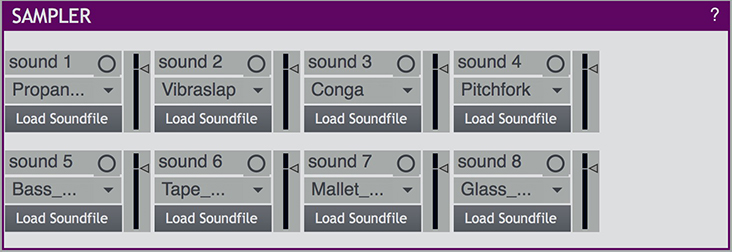
The Sampler is a basic playback instrument that contains up to 8 ‘one-shot’ samplers. Each contains a sound loaded from a soundfile and, when triggered, plays the sound back once from start to finish.
By default, the samplers are loaded with a collection of percussive sounds, though you can select a new sound for each, or load your own custom sound from your computer. This module is equally adept at triggering longer sequences, as multiple sounds can be triggered so they are overlapping each other.
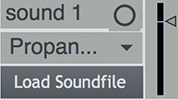
Each individual one-shot sampler has the following features:
- Title bar and button to audition the sound.
- Drop down menu to select a new sound from the available built-in sound library. Note that the Sampler sound library is separate from the sound libraries found in the Keyboard module.
- ‘Load Soundfile’ button opens up a dialog window from which you can select a soundfile from your computer to load into the sampler.
- Level meter and volume control on the right that allows you to monitor the sound output and adjust the volume of each sound individually to create the correct mix across all of the sounds.
VI. Presets
AUMI presets are new with version 4. While the old application allowed you to save certain parts of the setups individually, such as video or scale settings, AUMI v4. can save the entire state of the application in a preset. Presets can be copied and edited simply, and can be imported and exported between computers.
The presets section functions in two basic ways. First, the settings of the application can be stored in a preset to be recalled at a later time. All settings of the application are saved. Conversely, previously saved settings can be loaded which will update all of the settings back to the state that the preset was saved in. Second, presets can be exported to a file, either individually or all together, that can be imported by another computer that that is running AUMI v4.
What is saved in a preset?
A preset saves the entire application state, so in a word, everything. It includes the selected interaction module and its associated settings like number of zones, size, and color; the selected sound module, instrument/sound selection, note sequence and/or scale selection, and the camera settings.
NOTE: If you have saved a preset that included custom user sounds, the preset will attempt to locate the specified directory. In the Keyboard module, recalling that preset will open the dialog window and ask you to confirm the folder. In the Sampler module, the user loaded sounds will automatically load provided they are in the same location on your computer. If you have moved the files, or if you are attempting to load a preset that was saved on a different computer, the custom user sounds will not be found and will not load.
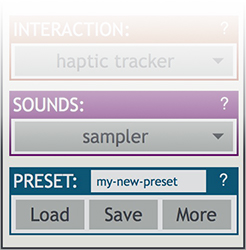
The presets section is located at the bottom of the Control Panel. The title bar displays the current preset (if one is active). On the far right is a [?] icon that can be pressed to open a help window. Beneath the title bar there are three buttons - Load, Save and More - each that opens a drop down menu with options.
Loading and Saving
Load
To load a preset, click on the Load button to open the drop down menu. This will display a list of all presets that are saved in the application. Select a desired preset and AUMI will update all settings to those saved within that preset. Note that, if no presets have yet been saved, none will be available to select.
Free mode
The last item in the Load menu is ‘free mode’. This mode will automatically save the current settings as you use it. If you load a preset, you can return to ‘free mode’ and the last settings that you had been using will be restored. Once you quit AUMI, the ‘free mode’ settings are discarded and will not be available when you start a new session. If you do wish to preserve settings from ‘free mode’ you can save them as a new preset.
Save
To save a preset, click on the Save button to open the drop down menu. To save settings to a new preset, click on the top item ‘Create new’. In the window that opens, give the preset a name and press ‘Ok’ to save. To overwrite an existing preset, click on a preset name in the menu beneath ‘Create new’. In the window that opens, press ‘Ok’ and the preset will be updated with the current settings. You may also change the name of the preset if you choose.
NOTE: Even if you change the name of an existing preset it will still overwrite it, and the previous preset settings will be lost. If you want to save a copy of an existing preset, use the ‘Create new’ option to save it separately.
Importing and Exporting
Settings can be shared between users by importing and exporting preset files between computers. There are two types of preset files, identifiable by the file extension: a .aumi file contains the settings for a single preset, while a .json file contains a bundle of all presets stored on a computer.
NOTE: Single preset (
.aumi) and multiple preset (.json) files are saved in different formats and thus are not cross compatible. Therefore you may not selectively import a single preset from a multiple preset file and vice versa.
Import a single preset
Click the More button to open the drop down menu of import/export options, and select ‘Import presets’. This will open a pop-up window asking what type of file you want to import. Select the first option ‘Single (.aumi)’. This will open a file dialog window, from which you can select a .aumi preset file. Once you have selected the file, click ‘Open’ and it will load the preset and add it to your list of available presets. If you select an invalid file, the dialog will alert you and ask you to try again or cancel.
Import multiple presets
IMPORTANT: This operation will overwrite the existing presets saved on your computer. If you are going to use this function, you may wish to export your existing presets to a file beforehand so you can retrieve them later.
Click the More button to open the drop down menu and select ‘Import presets’. Select the second option ‘Multiple (.json)’ from the import window that opens. This will open a file dialog window, from which you can select a valid .json preset file. Once you have selected the file, click ‘Open’ and the the presets contained in the file will be stored in AUMI, overwriting your existing presets. The first imported preset will be loaded.
NOTE: As mentioned above, this operation overwrites your current presets. Proceed with caution! At this time there is no way to append them to the current presets, though this may be added in future updates. You may, however append single presets (
.aumifiles) to your existing.
Export single preset
Make sure that the preset you want to export is loaded. Click the More button to open the drop down menu and choose ‘Export current preset’. A save dialog window will open where you can select the name and location of the preset file to save. The .aumi file extension will appear by default, though if you rename your file to something else, it will be automatically added (i.e., entering a filename of ‘my-preset’ will yield a file named my-preset.aumi).
Export all presets
Click the More button to open the drop down menu and choose ‘Export all’. A save dialog window will open where you can select the name and location of the preset file to save. The filetype must be set as ‘JSON’.
Delete
You can delete unwanted presets by selecting ‘Delete’ in the More menu. A pop-up window will open and from the drop down menu you can select a single preset or ‘Delete all’ option. The window will ask you to confirm your choice. Choose ‘Yes, continue’ to proceed. Note that once you have deleted a preset you will not be able to restore it unless you have previously exported it to a file.
Appendices
A. Keyboard Shortcuts
| Action | Keyboard Shortcut |
|---|---|
| Decrease size of application | - or _ |
| Increase size of application | = or + |
| Return application window to default size | 0 |
| Full screen video display | escape |
| Re-center the tracking dot (zone and radial tracker) | spacebar |
B. Best Practices and Tips (Key Points to Using the AUMI Software)
Tracker Optimization
- Use AUMI in a well-lit environment. Because the fundamental interaction utilizes a camera and motion tracking algorithms, optimal performance is achieved when the camera can ‘see’ clearly. Avoid low-light situations, excessive glare (like a direct light source within view of the camera), deep shadows, and other challenging lighting situations.
- Optimize the camera input with the Camera settings panel. Trial and error with the Brightness and Contrast settings can improve the camera image so that physical features stand out more clearly for tracking. The Zoom control can focus the camera input on a smaller area which may help to focus the tracking on a single point and ignore extraneous movement. This is especially true when using the Relative Movement module.
- Is possible, position AUMI in such a way that the user is positioned in front of a neutral backdrop. The motion tracking algorithm recognizes contrasts in color and brightness, therefore movement will be recognized more clearly when there is less of interest in the rest of the field of view.
- If possible, the AUMI user should wear neutral clothing if it will be in the camera’s view. For instance, it is easier to track movement in front of a solid colored shirt than one with bright colors and a busy pattern.
- As AUMI is designed to track points primarily without the need for any additional hardware or accessories, choose a point of high contrast to be tracked and take care to limit other areas in the view that could be confused. Common sense applies, e.g., if tracking a user’s hand, ensure that their shirt is a different color than their skin tone.
- In particularly difficult tracking situations, a brightly colored marker held by or attached to the user may be highly effective.
- Start with good positioning. The posture of the user is of utmost importance for improved interaction with their environment. They should be set in front of the camera with settings adjusted to their movements can be adequately captured withing the tracking guides on the screen. Depending on the user’s desired tracking point and range of motion, they might operate very close to the camera or benefit from having the camera zoomed in, while another setup might favor the user a few feet away so that the camera can capture their whole body movements.
C. Troubleshooting
Download, installation and proper operation
Problem: Application doesn’t open (Mac)
Check in your
/Applicationsdirectory to see if there is a previous version of AUMI installed there. If there is, you will need to delete it or move it to a different location, otherwise the new application will not function.In the Finder, go to
~/Library/Application Support/AUMI. Look for the following files:last.txt,presetfile.json, andusernames.txt. If they exist, delete them. These files store user preset information, and if they exist here, it means that they were saved by a previous version of the AUMI application. Note that presets saved with AUMI v3 and older are not compatible with v4.
Problem: Application is running but so sound is produced
Check that the camera is on and interaction and sound modules have been selected.
Check the ‘Audio Status’ in the Audio menu. Ensure that the correct audio playback device for your computer is selected, and volume is turned up.
If you are using MIDI, check the settings of your MIDI device (either your computer’s internal MIDI settings or your external MIDI device) to ensure that it is receiving MIDI messages properly and is mapped to a sound source.
Problem: Camera is not recognized and camera display is blank
- Open camera settings and check the ‘Device’ menu to check your camera is there. If it is there but will not open, or is not listed, try disconnecting and reconnecting the camera (if it is an external camera) and restarting the app. If it still doesn’t open, consult your operating system and/or camera operation instructions.
General performance and settings
Problem: Tracking dot is getting lost or not properly following the set tracking point.
- To optimize tracking performance, the user should be facing the camera in front of a neutral uniform background. The tracking point should contrast clearly from the rest of the user’s features, clothing, and background. Neutral colored clothing is optimal. A tracking point should be selected that provides good contrast to the rest of the image, such as the user’s eye, if tracking the face.
- Ensure that the environment is well lit.
- Camera settings can be adjusted to account for difficult conditions such as too little or too much light, or excessive shadows.
- Optionally, a brightly colored marker of some sort can be used for a tracking point, such as using holding a tennis ball if the rest of the scene (clothing and background) is dark-colored.
- See Appendix B. Best Practices and Tips for more pointers on optimizing AUMI performance.
Problem: The tracking dot on the Radial Tracker module is unpredictable and hard to control.
- Adjust the sensitivity setting to match the amplitude of the user’s movements. A user that is making large and fast movements will require lower sensitivity, whereas a user with very limited mobility or slow movements will be helped by increasing the sensitivity.
D. Technical Support and Contact Information
For information and to get the most up to date version of AUMI, visit aumiapp.com.
For application support and to report any technical issues with AUMI, contact john.sullivan2@mail.mcgill.ca.
For general AUMI-related questions and comments, contact info@aumiapp.com.
To sign up for the AUMI mailing list, visit http://aumiapp.cpm/participate.php
AUMI version 4 was written by Ivan Franco. Subsequent updates, testing and ongoing development is done by John Sullivan, with technical support from Thomas Ciufo and Henry Lowengard.